
Nest + tool 实现 OpenClaw 同款定时任务功能(下)
上一篇我们实现了发送邮件、网络搜索的 tool,这篇继续来实现数据库增删改查、定时任务的 tool。
用 TypeORM 操作数据库
我们用 ORM 框架来操作数据库。ORM 是 Object Relational Mapping(对象关系映射),就是把对数据库表的操作转换为对对象的操作。这里用 TypeORM。
先把 mysql 的 docker 容器跑起来:
docker run -d \
  --name mysql \
  -p 3306:3306 \
  -e MYSQL_ROOT_PASSWORD=admin \
  mysql:8
安装 TypeORM 和 mysql 驱动包:
pnpm install --save @nestjs/typeorm typeorm mysql2在 AppModule 引入,指定数据库连接信息、database:
import { Module } from '@nestjs/common';
import { TypeOrmModule } from '@nestjs/typeorm';

@Module({
  imports: [
    TypeOrmModule.forRoot({
      type: 'mysql',
      host: 'localhost',
      port: 3306,
      username: 'root',
      password: 'admin',
      database: 'hello',
      synchronize: true, // 服务启动时自动建表
      logging: true,     // 打印 sql 语句
      entities: [User, Job],
    }),
  ],
})
export class AppModule {}
然后创建一个 users 模块:
nest g resource users --no-spec--no-spec 是不生成测试代码。
ORM 就是把 class 和数据库表对应。我们改一下 src/users/entities/user.entity.ts:
import {
  Column,
  CreateDateColumn,
  Entity,
  PrimaryGeneratedColumn,
  UpdateDateColumn,
} from 'typeorm';

@Entity()
export class User {
  @PrimaryGeneratedColumn()
  id: number;

  @Column({
    length: 50,
  })
  name: string;

  @Column({
    length: 50,
  })
  email: string;

  @CreateDateColumn({
    type: 'timestamp',
  })
  createdAt: Date;

  @UpdateDateColumn({
    type: 'timestamp',
  })
  updatedAt: Date;
}
通过 @Entity 标识这个 class 是 entity,然后添加 id、name、email、createdAt、updatedAt 字段。在 entities 数组这里引入,这样 typeorm 就知道这是一个 entity,需要在数据库中创建对应的表。
我们开启了 synchronize 为 true,会在服务启动的时候自动建表;开启了 logging 为 true,会打印 sql 语句。跑一下 pnpm run start:dev,可以看到 TypeORM 根据 entities 自动创建了 user 表。
之后我们对 entity 的操作就会转化为对对应的数据库表的 CRUD 的 sql。
改下 UsersService:
import { Inject, Injectable } from '@nestjs/common';
import { CreateUserDto } from './dto/create-user.dto';
import { UpdateUserDto } from './dto/update-user.dto';
import { EntityManager } from 'typeorm';
import { User } from './entities/user.entity';

@Injectable()
export class UsersService {
  @Inject(EntityManager)
  entityManager: EntityManager;

  create(createUserDto: CreateUserDto) {
    return this.entityManager.save(User, createUserDto);
  }

  findAll() {
    return this.entityManager.find(User);
  }

  findOne(id: number) {
    return this.entityManager.findOne(User, { where: { id } });
  }

  update(id: number, updateUserDto: UpdateUserDto) {
    return this.entityManager.update(User, id, updateUserDto);
  }

  remove(id: number) {
    return this.entityManager.delete(User, id);
  }
}
注入了 EntityManager 来操作 User 的 entity。这里 dto 是用来接收用户传过来的参数的。改一下 create-user.dto.ts:
import { IsEmail, IsNotEmpty, MaxLength } from 'class-validator';

export class CreateUserDto {
  @IsNotEmpty()
  @MaxLength(50)
  name: string;

  @IsNotEmpty()
  @IsEmail()
  @MaxLength(50)
  email: string;
}
只接受 name、email 就好了,id 是自动生成的,createdAt、updatedAt 也会自动更新值。用 class-validator 来做参数校验,安装下:
pnpm install class-validator然后测试下,这里用 curl 来测接口:
# 创建
curl -X POST http://localhost:3000/users \
  -H "Content-Type: application/json" \
  -d '{
    "name": "Alice",
    "email": "alice@example.com"
  }'

# 查询所有
curl http://localhost:3000/users

# 查询单个
curl http://localhost:3000/users/1

# 更新
curl -X PATCH http://localhost:3000/users/1 \
  -H "Content-Type: application/json" \
  -d '{
    "name": "Only Name Changed"
  }'

# 删除
curl -X DELETE http://localhost:3000/users/1
当然,不用自己写这个 curl,让 AI 根据你的接口生成就行。
封装数据库 CRUD Tool
接下来封装成 tool,就可以用自然语言来操作数据库了。先导出 UsersService,这样其他模块 import 这个模块后就可以注入这个 service。在 AiModule 里 import 这个模块,加一个 provider:
{
  provide: 'DB_USERS_CRUD_TOOL',
  useFactory: (usersService: UsersService) => {
    const dbUsersCrudArgsSchema = z.object({
      action: z
        .enum(['create', 'list', 'get', 'update', 'delete'])
        .describe('要执行的操作:create、list、get、update、delete'),
      id: z
        .number()
        .int()
        .positive()
        .optional()
        .describe('用户 ID(get / update / delete 时需要)'),
      name: z
        .string()
        .min(1)
        .max(50)
        .optional()
        .describe('用户姓名(create 或 update 时可用)'),
      email: z
        .string()
        .email()
        .max(50)
        .optional()
        .describe('用户邮箱(create 或 update 时可用)'),
    });

    return tool(
      async ({
        action,
        id,
        name,
        email,
      }: {
        action: 'create' | 'list' | 'get' | 'update' | 'delete';
        id?: number;
        name?: string;
        email?: string;
      }) => {
        switch (action) {
          case 'create': {
            if (!name || !email) {
              return '创建用户需要同时提供 name 和 email。';
            }
            const created = await usersService.create({ name, email });
            return `已创建用户:ID=${(created as any).id},姓名=${(created as any).name},邮箱=${(created as any).email}`;
          }
          case 'list': {
            const users = await usersService.findAll();
            if (!users.length) {
              return '数据库中还没有任何用户记录。';
            }
            const lines = users
              .map(
                (u: any) =>
                  `ID=${u.id},姓名=${u.name},邮箱=${u.email},创建时间=${u.createdAt?.toISOString?.() ?? u.createdAt}`,
              )
              .join('\n');
            return `当前数据库 users 表中的用户列表:\n${lines}`;
          }
          case 'get': {
            if (!id) {
              return '查询单个用户需要提供 id。';
            }
            const user = await usersService.findOne(id);
            if (!user) {
              return `ID 为 ${id} 的用户在数据库中不存在。`;
            }
            const u: any = user;
            return `用户信息:ID=${u.id},姓名=${u.name},邮箱=${u.email},创建时间=${u.createdAt}`;
          }
          case 'update': {
            if (!id) {
              return '更新用户需要提供 id。';
            }
            const payload: any = {};
            if (name !== undefined) payload.name = name;
            if (email !== undefined) payload.email = email;
            if (!Object.keys(payload).length) {
              return '未提供需要更新的字段(name 或 email),本次不执行更新。';
            }
            const existing = await usersService.findOne(id);
            if (!existing) {
              return `ID 为 ${id} 的用户在数据库中不存在。`;
            }
            await usersService.update(id, payload);
            const updated: any = await usersService.findOne(id);
            return `已更新用户:ID=${id},姓名=${updated?.name},邮箱=${updated?.email}`;
          }
          case 'delete': {
            if (!id) {
              return '删除用户需要提供 id。';
            }
            const existing: any = await usersService.findOne(id);
            if (!existing) {
              return `ID 为 ${id} 的用户在数据库中不存在,无需删除。`;
            }
            await usersService.remove(id);
            return `已删除用户:ID=${id},姓名=${existing.name},邮箱=${existing.email}`;
          }
          default:
            return `不支持的操作: ${action}`;
        }
      },
      {
        name: 'db_users_crud',
        description:
          '对数据库 users 表执行增删改查操作。通过 action 字段选择 create/list/get/update/delete 操作,配合 id/name/email 参数。',
        schema: dbUsersCrudArgsSchema,
      },
    );
  },
  inject: [UsersService],
},
封装了数据库增删改查的 tool,插入 action 和参数,执行对应的操作。在 AiService 里注入,绑定到 model,加一下对应的 tool call 逻辑(和 query_user、send_mail 一样的分支处理),跑一下就能用自然语言操作数据库了。
小提示:如果模型不够聪明,让它"改李四的邮箱"时一直提示需要用户 id,可以在 prompt 里说明"需要 id 时先调 list 查出 id 再操作"。
cron 表达式
最后我们来实现定时任务的 tool。
定时任务就是指定一个时间,到时会执行某个任务。一般都是用 cron 来做。cron 有一个表达式,有 7 个字段(年是可选的,所以一般 6 个):
秒 分 时 日 月 星期 [年]每个字段都可以写 *,比如秒写 * 就代表每秒都会触发,日期写 * 就代表每天都会触发。
但当你指定了具体的日期的时候,星期得写 ?。比如表达式是 7 12 13 10 * ?,就是每月 10 号的 13:12:07 执行这个定时任务。但这时候你不知道是星期几,如果写 * 代表不管哪天都会执行,这时候就要写 ?,代表忽略星期。
cron 表达式细节挺多的,这里不展开,用到的时候问 AI 就好了。
安装下相关的包:
pnpm install cron @nestjs/schedule
pnpm install --dev @types/cron
注意:
pnpm install --dev会报Unknown option: 'dev',应该用pnpm install --save-dev @types/cron或者pnpm add -D @types/cron。
引入定时任务模块:
import { ScheduleModule } from '@nestjs/schedule';

@Module({
  imports: [ScheduleModule.forRoot()],
})
export class AppModule {}
写下测试代码:实现了 OnApplicationBootstrap 就可以在 onApplicationBootstrap 里加一些应用启动时执行的逻辑。注入 SchedulerRegistry,创建 CronJob,启动,5s 后删除定时任务:
import { Injectable, OnApplicationBootstrap } from '@nestjs/common';
import { SchedulerRegistry } from '@nestjs/schedule';
import { CronJob } from 'cron';

@Injectable()
export class TestService implements OnApplicationBootstrap {
  constructor(private readonly schedulerRegistry: SchedulerRegistry) {}

  async onApplicationBootstrap() {
    const job = new CronJob('*/5 * * * * *', () => {
      console.log('每 5 秒执行一次');
    });
    this.schedulerRegistry.addCronJob('test', job);
    job.start();

    // 5s 后删除定时任务
    setTimeout(() => {
      this.schedulerRegistry.deleteCronJob('test');
    }, 5000);
  }
}
除了 cron 类型的定时任务外,还有 timeout、interval 类型。OpenClaw 源码里也是这三种定时任务。
Job 表:持久化定时任务
首先我们要创建一个定时任务表来保存所有定时任务。比如豆包的定时任务有列表、删除功能,这需要把定时任务持久化管理。
创建 job 模块:
nest g module job
nest g service job --no-spec
然后添加 job/entities/job.entity.ts:
import {
  Column,
  CreateDateColumn,
  Entity,
  PrimaryGeneratedColumn,
  UpdateDateColumn,
} from 'typeorm';

export type JobType = 'cron' | 'every' | 'at';

@Entity()
export class Job {
  @PrimaryGeneratedColumn('uuid')
  id: string;

  @Column({ type: 'text' })
  instruction: string;

  @Column({ type: 'varchar', length: 10, default: 'cron' })
  type: JobType;

  // cron 类型使用(Cron 表达式)
  @Column({ type: 'varchar', length: 100, nullable: true })
  cron: string | null;

  // every 类型使用(间隔毫秒)
  @Column({ type: 'int', nullable: true })
  everyMs: number | null;

  // at 类型使用(指定触发时间点)
  @Column({ type: 'timestamp', nullable: true })
  at: Date | null;

  @Column({ default: true })
  isEnabled: boolean;

  @Column({ type: 'timestamp', nullable: true })
  lastRun: Date | null;

  @CreateDateColumn({ type: 'timestamp' })
  createdAt: Date;

  @UpdateDateColumn({ type: 'timestamp' })
  updatedAt: Date;
}
id 作为定时任务的 id,所以用 uuid 的字符串。instruction 是指令文本,比如"每天晚上 10 点提醒我写今日总结",这个"写今日总结"就是指令文本。type 我们也分了 cron、every、at 三种定时任务类型:cron 保存 cron 表达式,everyMs 保存时间间隔,at 保存时间点。isEnabled 是任务开启关闭状态。
注册下这个 Entity,服务会自动重启,然后会创建表。
接下来写一下 JobService,管理定时任务:
import {
  Inject,
  Injectable,
  Logger,
  NotFoundException,
  OnApplicationBootstrap,
} from '@nestjs/common';
import { SchedulerRegistry } from '@nestjs/schedule';
import { CronJob } from 'cron';
import { EntityManager } from 'typeorm';
import { Job } from './entities/job.entity';

@Injectable()
export class JobService implements OnApplicationBootstrap {
  private readonly logger = new Logger(JobService.name);

  @Inject(EntityManager)
  private readonly entityManager: EntityManager;

  @Inject(SchedulerRegistry)
  private readonly schedulerRegistry: SchedulerRegistry;

  // 应用启动时,把数据库里所有启用的任务恢复到调度器里(重启不丢任务的关键)
  async onApplicationBootstrap() {
    const enabledJobs = await this.entityManager.find(Job, {
      where: { isEnabled: true },
    });
    const cronJobs = this.schedulerRegistry.getCronJobs();
    const intervals = this.schedulerRegistry.getIntervals();
    const timeouts = this.schedulerRegistry.getTimeouts();

    for (const job of enabledJobs) {
      const alreadyRegistered =
        (job.type === 'cron' && cronJobs.has(job.id)) ||
        (job.type === 'every' && intervals.includes(job.id)) ||
        (job.type === 'at' && timeouts.includes(job.id));
      if (alreadyRegistered) continue;
      await this.startRuntime(job);
    }
  }

  async listJobs() {
    const jobs = await this.entityManager.find(Job, {
      order: { createdAt: 'DESC' },
    });
    const cronJobs = this.schedulerRegistry.getCronJobs();
    const intervalNames = this.schedulerRegistry.getIntervals();
    const timeoutNames = this.schedulerRegistry.getTimeouts();

    return jobs.map((job) => {
      const running =
        job.isEnabled &&
        ((job.type === 'cron' && cronJobs.has(job.id)) ||
          (job.type === 'every' && intervalNames.includes(job.id)) ||
          (job.type === 'at' && timeoutNames.includes(job.id)));
      return {
        ...job,
        running,
      };
    });
  }

  async addJob(
    input:
      | {
          type: 'cron';
          instruction: string;
          cron: string;
          isEnabled?: boolean;
        }
      | {
          type: 'every';
          instruction: string;
          everyMs: number;
          isEnabled?: boolean;
        }
      | {
          type: 'at';
          instruction: string;
          at: Date;
          isEnabled?: boolean;
        },
  ) {
    const entity = this.entityManager.create(Job, {
      instruction: input.instruction,
      type: input.type,
      cron: input.type === 'cron' ? input.cron : null,
      everyMs: input.type === 'every' ? input.everyMs : null,
      at: input.type === 'at' ? input.at : null,
      isEnabled: input.isEnabled ?? true,
      lastRun: null,
    });
    const saved = await this.entityManager.save(Job, entity);
    if (saved.isEnabled) {
      await this.startRuntime(saved);
    }
    return saved;
  }

  async toggleJob(jobId: string, enabled?: boolean) {
    const job = await this.entityManager.findOne(Job, { where: { id: jobId } });
    if (!job) throw new NotFoundException(`Job not found: ${jobId}`);

    const nextEnabled = enabled ?? !job.isEnabled;
    if (job.isEnabled !== nextEnabled) {
      job.isEnabled = nextEnabled;
      await this.entityManager.save(Job, job);
    }

    if (job.isEnabled) {
      await this.startRuntime(job);
    } else {
      this.stopRuntime(job);
    }
    return job;
  }

  private async startRuntime(job: Job) {
    if (job.type === 'cron') {
      const cronJobs = this.schedulerRegistry.getCronJobs();
      const existing = cronJobs.get(job.id);
      if (existing) {
        existing.start();
        return;
      }
      const runtimeJob = this.createCronJob(job);
      this.schedulerRegistry.addCronJob(job.id, runtimeJob);
      runtimeJob.start();
      return;
    }

    if (job.type === 'every') {
      const names = this.schedulerRegistry.getIntervals();
      if (names.includes(job.id)) return;
      if (typeof job.everyMs !== 'number' || job.everyMs <= 0) {
        throw new Error(`Invalid everyMs for job ${job.id}`);
      }
      const ref = setInterval(async () => {
        this.logger.log(`run job ${job.id}, ${job.instruction}`);
        await this.entityManager.update(Job, job.id, { lastRun: new Date() });
      }, job.everyMs);
      this.schedulerRegistry.addInterval(job.id, ref);
      return;
    }

    if (job.type === 'at') {
      const names = this.schedulerRegistry.getTimeouts();
      if (names.includes(job.id)) return;
      if (!job.at) {
        throw new Error(`Invalid at for job ${job.id}`);
      }
      const delay = Math.max(0, job.at.getTime() - Date.now());
      const ref = setTimeout(async () => {
        this.logger.log(`run job ${job.id}, ${job.instruction}`);
        await this.entityManager.update(Job, job.id, {
          lastRun: new Date(),
          isEnabled: false, // at 类型只执行一次:执行完自动停用
        });
        try {
          this.schedulerRegistry.deleteTimeout(job.id);
        } catch {
          // ignore
        }
      }, delay);
      this.schedulerRegistry.addTimeout(job.id, ref);
      return;
    }
  }

  private stopRuntime(job: Job) {
    if (job.type === 'cron') {
      const cronJobs = this.schedulerRegistry.getCronJobs();
      const runtimeJob = cronJobs.get(job.id);
      if (runtimeJob) runtimeJob.stop();
      return;
    }
    if (job.type === 'every') {
      try {
        this.schedulerRegistry.deleteInterval(job.id);
      } catch {
        // ignore
      }
      return;
    }
    if (job.type === 'at') {
      try {
        this.schedulerRegistry.deleteTimeout(job.id);
      } catch {
        // ignore
      }
      return;
    }
  }

  private createCronJob(job: Job) {
    const cronExpr = job.cron ?? '';
    return new CronJob(cronExpr, async () => {
      this.logger.log(`run job ${job.id}, ${job.instruction}`);
      await this.entityManager.update(Job, job.id, { lastRun: new Date() });
    });
  }
}
整体还是比较清晰的:任务列表、创建定时任务、切换任务状态(toggleJob 就是个开关)。
注意:
entityManager.save(Job, job)传入了 id 就是修改,不是新增。这就是为什么服务重启任务不会丢:定时任务存到了数据库,应用启动时
onApplicationBootstrap会把没跑完的任务重新注册到调度器继续跑。
封装 CRON_JOB_TOOL
我们把它封装成 tool 来调用下。先导出 JobService,在 AiModule 引入,然后注入这个 JobService 来实现 tool 的 provider:
{
  provide: 'CRON_JOB_TOOL',
  useFactory: (jobService: JobService) => {
    const cronJobArgsSchema = z.object({
      action: z
        .enum(['list', 'add', 'toggle'])
        .describe('要执行的操作:list、add、toggle'),
      id: z.string().optional().describe('任务 ID(toggle 时需要)'),
      enabled: z
        .boolean()
        .optional()
        .describe('是否启用(toggle 可选;不传则自动取反)'),
      type: z
        .enum(['cron', 'every', 'at'])
        .optional()
        .describe(
          '任务类型(add 时需要):cron(按 Cron 表达式循环执行)/ every(按固定间隔毫秒循环执行)/ at(到点执行一次)',
        ),
      instruction: z
        .string()
        .optional()
        .describe(
          '任务说明 / 指令(add 时需要)。要求:\n1) 从用户自然语言中去掉"什么时候执行"的定时部分,只保留要执行的动作描述;\n2) 例如"1 分钟后提醒我喝水"的 instruction 是"提醒我喝水"',
        ),
      cron: z
        .string()
        .optional()
        .describe('Cron 表达式(type=cron 时需要,例如 */5 * * * * *)'),
      everyMs: z
        .number()
        .int()
        .positive()
        .optional()
        .describe('固定间隔毫秒(type=every 时需要,例如 60000 表示每分钟执行一次)'),
      at: z
        .string()
        .optional()
        .describe(
          '指定触发时间点(type=at 时需要,ISO 字符串,例如 2026-03-18T12:34:56.000Z;到点执行一次)',
        ),
    });

    return tool(
      async ({
        action,
        id,
        enabled,
        type,
        instruction,
        cron,
        everyMs,
        at,
      }: {
        action: 'list' | 'add' | 'toggle';
        id?: string;
        enabled?: boolean;
        type?: 'cron' | 'every' | 'at';
        instruction?: string;
        cron?: string;
        everyMs?: number;
        at?: string;
      }) => {
        switch (action) {
          case 'list': {
            const jobs = await jobService.listJobs();
            if (!jobs.length) return '当前没有任何定时任务。';
            const lines = jobs
              .map((j: any) => {
                return `id=${j.id} type=${j.type} enabled=${j.isEnabled} running=${j.running} instruction=${j.instruction}`;
              })
              .join('\n');
            return `当前定时任务列表(type 说明:cron=按表达式循环;every=按间隔循环;at=到点执行一次):\n${lines}`;
          }
          case 'add': {
            if (!type) return '新增任务需要提供 type(cron/every/at)。';
            if (!instruction) return '新增任务需要提供 instruction。';
            if (type === 'cron') {
              if (!cron) return 'type=cron 时需要提供 cron。';
              const created = await jobService.addJob({
                type,
                instruction,
                cron,
                isEnabled: true,
              });
              return `已新增定时任务:id=${(created as any).id} type=cron cron=${(created as any).cron}`;
            }
            if (type === 'every') {
              if (typeof everyMs !== 'number' || everyMs <= 0) {
                return 'type=every 时需要提供 everyMs(正整数,单位毫秒)。';
              }
              const created = await jobService.addJob({
                type,
                instruction,
                everyMs,
                isEnabled: true,
              });
              return `已新增定时任务:id=${(created as any).id} type=every everyMs=${(created as any).everyMs}`;
            }
            if (type === 'at') {
              if (!at) return 'type=at 时需要提供 at(ISO 时间字符串)。';
              const date = new Date(at);
              if (Number.isNaN(date.getTime())) {
                return 'type=at 的 at 不是合法的 ISO 时间字符串。';
              }
              const created = await jobService.addJob({
                type,
                instruction,
                at: date,
                isEnabled: true,
              });
              return `已新增定时任务:id=${(created as any).id} type=at at=${(created as any).at}`;
            }
            return `不支持的任务类型: ${type}`;
          }
          case 'toggle': {
            if (!id) return 'toggle 任务需要提供 id。';
            const updated = await jobService.toggleJob(id, enabled);
            return `已更新任务状态:id=${(updated as any).id} enabled=${(updated as any).isEnabled}`;
          }
          default:
            return `不支持的操作: ${action}`;
        }
      },
      {
        name: 'cron_job',
        description:
          '管理服务端定时任务(支持 list/add/toggle)。\n\n类型语义:\n- type=at:到指定时间点只执行一次;\n- type=every:按固定间隔毫秒循环执行;\n- type=cron:按 Cron 表达式循环执行。',
        schema: cronJobArgsSchema,
      },
    );
  },
  inject: [JobService],
},
和之前数据库增删改查的 tool 差不多,就是传入 action 和对应参数就可以了,具体实现就是根据 action 调用对应的方法。
在 AiService 注入这个 tool,绑定到 model,加一下对应 tool call 的处理。
这里还要改下 prompt,明确下定时任务的使用方式:
new SystemMessage(
  `你是一个通用任务助手,可以根据用户的目标规划步骤,并在需要时调用工具:\`query_user\` 查询或校验用户信息、\`send_mail\` 发送邮件、\`web_search\` 搜索网页、\`db_users_crud\` 增删改查用户、\`cron_job\` 创建/管理定时任务。

定时任务类型选择规则(非常重要):
- 用户说"X 分钟 / 小时 / 天后""在某个时间点""到点提醒"(一次性)=> 用 \`cron_job\` + \`type=at\`(执行一次)
- 用户说"每 X 分钟 / 每小时 / 每天""定期 / 循环 / 一直"(重复执行)=> 用 \`cron_job\` + \`type=every\`(每次固定间隔)
- 用户给出 Cron 表达式或明确说"用 cron 表达式"(重复执行)=> 用 \`cron_job\` + \`type=cron\`

在调用 \`cron_job.add\` 创建任务时,需要把用户原始自然语言拆成两部分:一部分是"什么时候执行"(用来决定 type 和 cron/everyMs/at 参数),一部分是"做什么"(作为 instruction 保存)。

当用户请求"在未来某个时间点执行某个动作"(例如"1 分钟后给我发一个笑话到邮箱")时,本轮对话只需要使用 \`cron_job\` 创建定时任务,不要立刻执行这个动作!

注意:像"\`1 分钟后提醒我喝水\`",时间相关信息用于计算下一次执行时间,而 \`instruction\` 应该是"提醒我喝水"。`,
),
主要是明确一下三种定时任务类型的场景,并强调创建定时任务后不要立刻执行动作。
测一下,三种定时任务的触发都没问题了。
补充:给
type=at计算时间时,大模型不知道当前时间,可能把"10 分钟后"算成 2024 年之类的错时间。所以后面加了一个获取当前时间的 tool(time_now),让模型先拿当前时间再算触发点。
重构:独立的 ToolModule
现在的执行逻辑只是打印,具体执行应该也是一个 agent loop。我们先把现在的 tool 重构下,因为 agent loop 也会用到这些 tool。
创建一个新的目录 tool,单独一个模块来管理 tool:
import { forwardRef, Module } from '@nestjs/common';
import { UsersModule } from '../users/users.module';
import { LlmService } from './llm.service';
import { SendMailToolService } from './send-mail-tool.service';
import { WebSearchToolService } from './web-search-tool.service';
import { DbUsersCrudToolService } from './db-users-crud-tool.service';
import { TimeNowToolService } from './time-now-tool.service';
import { CronJobToolService } from './cron-job-tool.service';
import { JobModule } from '../job/job.module';

@Module({
  imports: [UsersModule, forwardRef(() => JobModule)],
  providers: [
    LlmService,
    SendMailToolService,
    WebSearchToolService,
    DbUsersCrudToolService,
    TimeNowToolService,
    CronJobToolService,
    {
      provide: 'CHAT_MODEL',
      useFactory: (llmService: LlmService) => llmService.getModel(),
      inject: [LlmService],
    },
    {
      provide: 'SEND_MAIL_TOOL',
      useFactory: (svc: SendMailToolService) => svc.tool,
      inject: [SendMailToolService],
    },
    {
      provide: 'WEB_SEARCH_TOOL',
      useFactory: (svc: WebSearchToolService) => svc.tool,
      inject: [WebSearchToolService],
    },
    {
      provide: 'DB_USERS_CRUD_TOOL',
      useFactory: (svc: DbUsersCrudToolService) => svc.tool,
      inject: [DbUsersCrudToolService],
    },
    {
      provide: 'TIME_NOW_TOOL',
      useFactory: (svc: TimeNowToolService) => svc.tool,
      inject: [TimeNowToolService],
    },
    {
      provide: 'CRON_JOB_TOOL',
      useFactory: (svc: CronJobToolService) => svc.tool,
      inject: [CronJobToolService],
    },
  ],
  exports: [
    'CHAT_MODEL',
    'SEND_MAIL_TOOL',
    'WEB_SEARCH_TOOL',
    'DB_USERS_CRUD_TOOL',
    'TIME_NOW_TOOL',
    'CRON_JOB_TOOL',
  ],
})
export class ToolModule {}
每个 tool 抽成一个 service,svc.tool 就是那个 tool() 创建的工具,provider 统一用 useFactory 从 service 里取。
还要加一个获取当前时间的 tool,不然你说"10 分钟之后执行",大模型根本不知道当前时间是什么:
// tool/time-now-tool.service.ts
import { Injectable } from '@nestjs/common';
import { tool } from '@langchain/core/tools';

@Injectable()
export class TimeNowToolService {
  readonly tool;

  constructor() {
    this.tool = tool(
      async () => {
        const now = new Date();
        return {
          iso: now.toISOString(),
          timestamp: now.getTime(),
        };
      },
      {
        name: 'time_now',
        description:
          '获取当前服务器时间,返回 ISO 字符串(iso)和毫秒级时间戳(timestamp)。',
      },
    );
  }
}
之后 AiModule 里就可以简化了:只要引入这个 ToolModule 就可以了。
定时任务专用 Agent Loop
然后我们实现定时任务专用的 agent loop,创建 ai/job-agent.service.ts:
import { Inject, Injectable, Logger } from '@nestjs/common';
import { ChatOpenAI } from '@langchain/openai';
import {
  AIMessage,
  BaseMessage,
  HumanMessage,
  SystemMessage,
  ToolMessage,
} from '@langchain/core/messages';
import { Runnable } from '@langchain/core/runnables';

@Injectable()
export class JobAgentService {
  private readonly logger = new Logger(JobAgentService.name);
  private readonly modelWithTools: Runnable<BaseMessage[], AIMessage>;

  constructor(
    @Inject('CHAT_MODEL') model: ChatOpenAI,
    @Inject('SEND_MAIL_TOOL') private readonly sendMailTool: any,
    @Inject('WEB_SEARCH_TOOL') private readonly webSearchTool: any,
    @Inject('DB_USERS_CRUD_TOOL') private readonly dbUsersCrudTool: any,
    @Inject('TIME_NOW_TOOL') private readonly timeNowTool: any,
  ) {
    this.modelWithTools = model.bindTools([
      this.sendMailTool,
      this.webSearchTool,
      this.dbUsersCrudTool,
      this.timeNowTool,
    ]);
  }

  async runJob(instruction: string): Promise<string> {
    const messages: BaseMessage[] = [
      new SystemMessage(
        '你是一个用于执行后台任务的智能代理。你会根据给定的任务指令,必要时调用工具(如 db_users_crud、web_search、send_mail、time_now 等)来完成任务。',
      ),
      new HumanMessage(instruction),
    ];

    while (true) {
      const aiMessage = await this.modelWithTools.invoke(messages);
      messages.push(aiMessage);
      const toolCalls = aiMessage.tool_calls ?? [];

      if (!toolCalls.length) {
        return String(aiMessage.content ?? '');
      }

      for (const toolCall of toolCalls) {
        const toolCallId = toolCall.id || '';
        const toolName = toolCall.name;

        if (toolName === 'send_mail') {
          const result = await this.sendMailTool.invoke(toolCall.args);
          messages.push(
            new ToolMessage({
              tool_call_id: toolCallId,
              name: toolName,
              content: result,
            }),
          );
        } else if (toolName === 'web_search') {
          const result = await this.webSearchTool.invoke(toolCall.args);
          messages.push(
            new ToolMessage({
              tool_call_id: toolCallId,
              name: toolName,
              content: result,
            }),
          );
        } else if (toolName === 'db_users_crud') {
          const result = await this.dbUsersCrudTool.invoke(toolCall.args);
          messages.push(
            new ToolMessage({
              tool_call_id: toolCallId,
              name: toolName,
              content: result,
            }),
          );
        } else if (toolName === 'time_now') {
          const result = await this.timeNowTool.invoke({});
          messages.push(
            new ToolMessage({
              tool_call_id: toolCallId,
              name: toolName,
              content: JSON.stringify(result),
            }),
          );
        } else {
          this.logger.warn(`未知工具调用: ${toolName}`);
        }
      }
    }
  }
}
注意这里注入的是除定时任务之外的其他 tool——禁止在定时任务里跑定时任务,避免无限递归。这里同步 invoke 就可以了,没必要用 stream。
然后改一下三种定时任务的实现,引入 JobAgentService。这里 ToolModule 用 forwardRef 是处理循环引用的问题,那边也是用这个:
import { forwardRef, Module } from '@nestjs/common';
import { ToolModule } from '../tool/tool.module';

@Module({
  imports: [forwardRef(() => ToolModule)],
  providers: [JobService, JobAgentService],
  exports: [JobService],
})
export class JobModule {}
之后改一下定时任务的实现逻辑:把打印日志改成用 agent loop 解析执行指令文本:
// startRuntime 里 each 类型触发时,不再只是打日志,而是调 agent loop:
private createCronJob(job: Job) {
  const cronExpr = job.cron ?? '';
  return new CronJob(cronExpr, async () => {
    this.logger.log(`run job ${job.id}, ${job.instruction}`);
    await this.jobAgentService.runJob(job.instruction); // 启动 agent loop 执行
    await this.entityManager.update(Job, job.id, { lastRun: new Date() });
  });
}

// every 类型:
const ref = setInterval(async () => {
  this.logger.log(`run job ${job.id}, ${job.instruction}`);
  await this.jobAgentService.runJob(job.instruction);
  await this.entityManager.update(Job, job.id, { lastRun: new Date() });
}, job.everyMs);

// at 类型:
const ref = setTimeout(async () => {
  this.logger.log(`run job ${job.id}, ${job.instruction}`);
  await this.jobAgentService.runJob(job.instruction);
  await this.entityManager.update(Job, job.id, {
    lastRun: new Date(),
    isEnabled: false,
  });
  // ...
}, delay);
就是这张图:
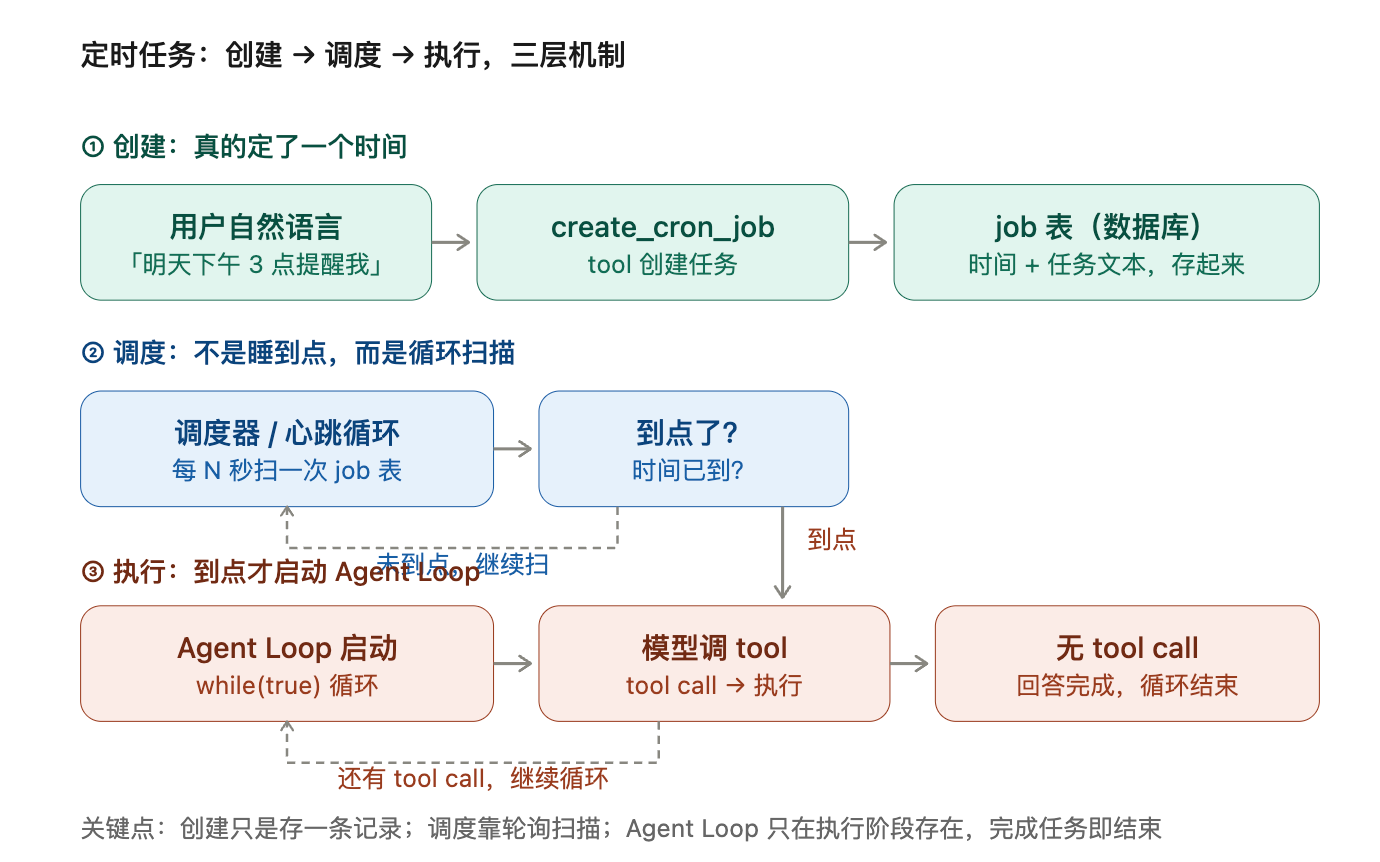
我们来测一下整体流程:让 AI 创建一个"每晚 10 点把今天 AI 相关新闻整理成邮件发给我"之类的任务,到点后它会自动拉起 JobAgentService 的 agent loop,搜索 → 整理 → 发邮件,一气呵成。
完成!OpenClaw、豆包,以及各种 Agent 产品的定时任务功能都是这么做的。学会一个 Agent 的定时任务实现,所有 Agent 的定时任务就都知道怎么做的了,一通百通!
代码上传了课程仓库:https://github.com/QuarkGluonPlasma/ai-agent-course-code
总结
- 用 TypeORM 这个 ORM 框架做的数据库增删改查,它会把对 Entity 的操作生成 sql 实现对数据库表的操作
- 用 AI 分析 OpenClaw 源码里有 cron、every、at 三种定时任务
- 我们实现了同款,用
@nestjs/schedule的 cronJob、interval、timeout - 调用大模型分析出哪一种定时任务,把后面的文本作为指令文本保存
- 到时间后会跑一个新的 Agent Loop 解析执行文本,调用 tool_call
各种 Agent 产品的定时任务功能都是这种方案,一通百通!
延伸思考:如果定时任务很多,每个 every/at 任务都创建 setTimeout/setInterval 定时器,会占内存。可以优化成:把到期任务放进队列(比如 BullMQ),由独立服务消费队列消息来跑定时任务,支持多实例部署、分布式调度。
延伸思考:定时任务多的时候,用队列 + 独立 Worker 优化
上面的实现里,每个定时任务都会在进程里挂一个 setTimeout / setInterval 定时器。如果定时任务有几百上千个,进程里就挂着上千个定时器,每个都占内存和句柄,资源压力会越来越大。
怎么优化呢?思路是把"定时"和"干活"彻底拆开,中间加一层队列:
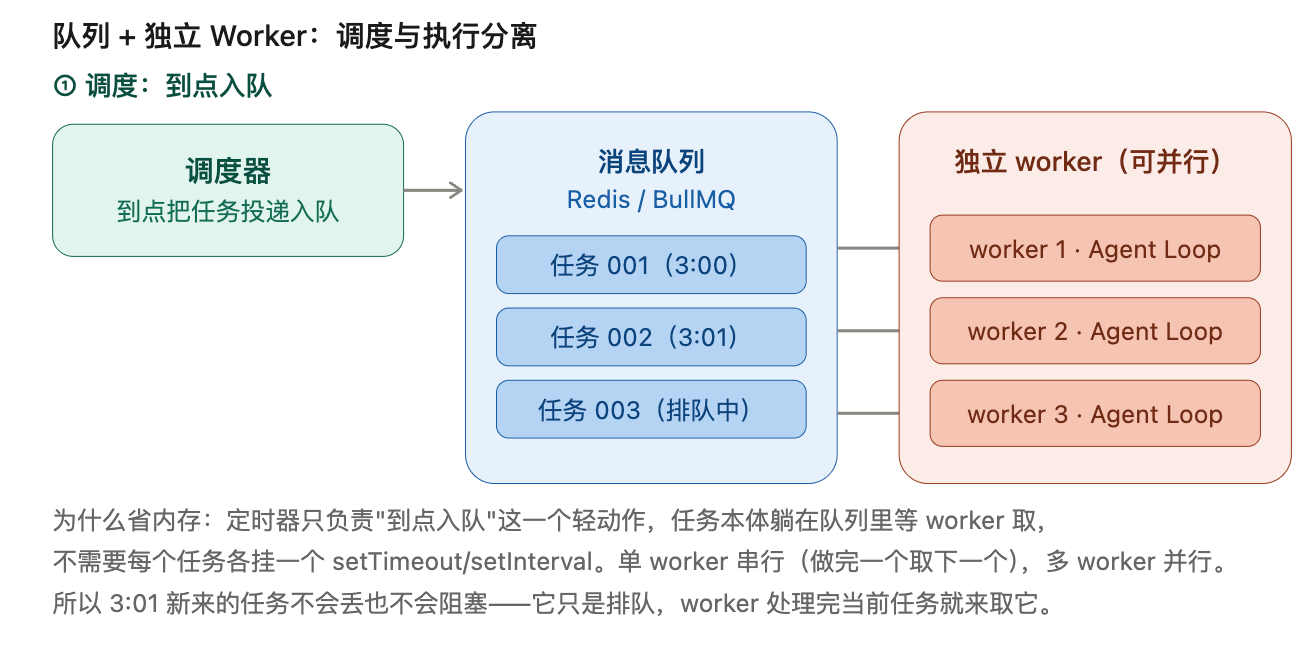
- 调度器:只负责一件事——到点把任务投递进队列(一个非常轻的动作,毫秒级,几乎不占资源)。
- 消息队列(Redis / BullMQ):任务躺在里面排队,存在 Redis 里,不占 Node 进程的内存。
- 独立 worker(服务/进程):不停从队列里取任务,取到一个就拉起一个 Agent Loop 去执行。
为什么省内存:之前每个任务各挂一个定时器,任务越多进程里挂的定时器越多;现在定时器只需要一个(或干脆用外部调度),任务本体都在队列里躺着,进程内存是恒定的。
任务来了是怎么处理的?会不会丢、会不会阻塞?
有人会以为定时任务是"while 循环等 3 点,到点开始做"——那是轮询方案,执行和检查挤在一个进程里,任务一多就堵,后到的任务要么排队等、要么被跳过。
队列方案完全不同:调度器到点只做"入队"这一个动作,执行是 worker 从队列里取,所以:
- 3:01 的任务到点 → 入队排着,不会丢;
- 单 worker:串行——worker 正在跑 3:00 的任务,跑完了再从队列取 3:01 的任务,后到的不丢,只是排队;
- 多个 worker(多进程/多实例部署):并行——worker 1 跑 3:00 的任务,同时 worker 2 可以从队列里取 3:01 的任务跑,互不干扰。
worker 数量可以横向扩容(3 个不够就起 10 个),队列是它们之间的"共享任务池",谁闲谁取,天然负载均衡。这也是豆包这类产品在多实例下不堵的底层原因。
预览到此为止,输入密码解锁全文
解锁后本机会记住,同密码的其他文章也无需重复输入